int led1 = 5; // Declaración de puertos donde están los LEDs
int led2 = 4;
int led3 = 3;
int led4 = 2;
int potenciometro = 1; // Definición de donde está conectado el pot
int lectura; // Variable donde se almacenará el resultado ADC
void setup()
{
pinMode (led1, OUTPUT); // Puertos LEDS configurados como salidas
pinMode (led2, OUTPUT);
pinMode (led3, OUTPUT);
pinMode (led4, OUTPUT);
}
void loop()
{
lectura = analogRead (potenciometro); // Conversión Analógica digital del puerto AN1
Serial.println(lectura); // Impresión del resultado ADC en la terminal
// Definición de los rangos
if (lectura <= 255)
{
digitalWrite(led1, HIGH);
digitalWrite(led2, LOW);
digitalWrite(led3, LOW);
digitalWrite(led4, LOW);
}
else if ((lectura >255)&&( lectura <= 511))
{
digitalWrite (led2, HIGH);
digitalWrite (led3, LOW);
digitalWrite (led4, LOW);
}
else if ((lectura >511)&&( lectura <= 767))
{
digitalWrite (led3, HIGH);
digitalWrite (led4, LOW);
}
else if ((lectura >767)&&( lectura <= 1023))
{
digitalWrite (led4, HIGH);
}
else // Si no se cumple ningún caso, se apagan los cuatro leds
{
digitalWrite (led1, LOW);
digitalWrite (led2, LOW);
digitalWrite (led3, LOW);
digitalWrite (led4, LOW);
}
}
/* PRACTICA NUMERO SESIÓN 6 Y 7 27/04/2016*/
//DECLARACIÓN DE VARIABLES
int led = 4; // VARIABLE LED PIN 4
int boton = 8; // VARIABLE BOTÓN PIN 8
int estado = 0; // AGREGAMOS UNA VARIABLE CON VALOR 0
void setup() {
pinMode (8, INPUT); // DECLARAMOS COMO ENTRADA BOTON
pinMode (4, OUTPUT); // DECLARAMOS COMO SALIDA EL LED
}
void loop() {
estado = digitalRead(8); // LEER EL ESTADO DEL BOTON
if(estado == HIGH){ //SI ESTA EN ALTO
digitalWrite(4, HIGH);//ENCIENDE EL LED
}
else{ //Y SI NO
digitalWrite(4, LOW);//APAGA EL LED
}
}
https://123d.circuits.io/circuits/2050069-the-unnamed-circuit/edit#breadboard
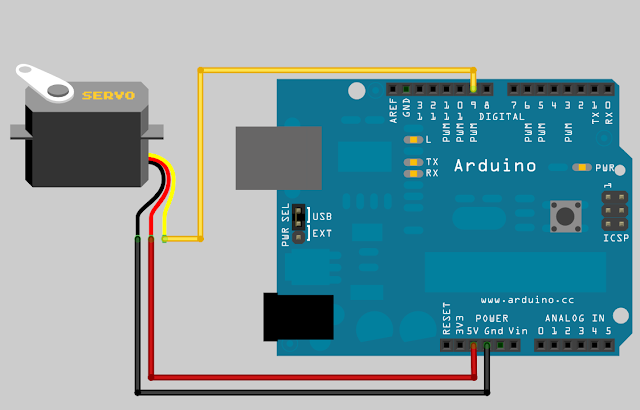
Practica Servo
#include <Servo.h> // Libreria Servomotores
Servo miServo;
int angulo = 90;
void setup(){
miServo.attach(9);
Serial.begin(9600);
}
void loop(){
unsigned char comando=0;
if(Serial.available()){ //solo leemos si hay un byte en el buffer
comando = Serial.read(); // leer el byte
if (comando=='a')angulo+=10; // incrementamos 10
else if (comando=='z')angulo-=10; // decrementamos
angulo=constrain(angulo,0,180); //restringimos el valor de 0 a 180
}
miServo.write(angulo); // Inicia nuestro servo
Serial.print("Angulo"); // Imprimir Angulos en texto
Serial.println(angulo); //Imprimir el valor de la la variable angulo
delay(100); // tiempo en milisegundos
}
ESTRATEGIA 3. Terminal / Serial.begin / Serial.print / Serial.println
int num;
void setup () {
Serial.begin (9600); // Hanilia e inicializa la Terminal a una velocidad
// de 9600 Bauds
}
void loop() {
Serial.println("Hola Alumno Robotix");
Serial.println(" ");
Serial.print("DECIMAL"); // Imprime un TEXTO
Serial.print("\t"); // Código de impresión de un tabulador horizontal
Serial.print("BINARIO"); // Imprime un TEXTO
Serial.println(""); // Imprime un salto de línea
//Impresión de los primeros 50 números en formato decimal y binario
for(num=0; num< 50; num++){
Serial.print(num, DEC); // Imprime el número en formato DECimal
Serial.print("\t"); // Código de impresión de un tabulador horizontal
Serial.println(num, BIN); // Imprime el número en formato BINario
// con un salto de línea
delay(250); // pausa en ms
}
Serial.println(""); // Imprime un salto de línea
}
Sensor Ultrasónico
Practica Final.. :)
#include <Servo.h>
const int trigger = 12;
const int echo = 11;
float dist, res;
Servo sd;
Servo si;
int led1 = 7;
int led2 = 6;
int led3 = 5;
int led4 = 4;
void bargraph (int led1, int led2, int led3, int led4)// Función bargraph
{
digitalWrite (7,led1);
digitalWrite (6,led2);
digitalWrite (5,led3);
digitalWrite (4,led4);
}
void setup(){
Serial.begin(9600);
pinMode(trigger, OUTPUT);
pinMode(echo, INPUT);
}
void loop(){
digitalWrite(trigger, LOW);
delayMicroseconds(5);
digitalWrite(trigger, HIGH);
delayMicroseconds(10);
digitalWrite(trigger, LOW);
//Adquirimos los datos y convertimos la media a cm
dist = pulseIn(echo, HIGH); //Este resultado esta en microsegundos
//Cuando la lectura del pin sea HIGH medira el tiempo que transcurre hasta que sea LOW en useg
dist = dist/58; //Se hace la conversion a centimetros
//Si queremos convertir a pulgadas se divide entre 148
Serial.print("Distancia = "); //Imprimimos en la terminal un texto "Distancia = "
Serial.print(dist); //Imprimimos en la terminal el valor de la distancia
Serial.print("cm"); //Imprimimos en la terminal un texto "cm"
Serial.write(10); //Enviamos en codigo ascii de "Nueva linea - salto de linea"
if(dist >= 30){
sd.attach(9);
si.attach(10);
sd.write(90);
si.write(180);
bargraph(0,1,1,0);
}
else if(dist <= 30){
sd.attach(9);
si.attach(10);
sd.write(180);
si.write(90);
bargraph(1,0,0,1);
}
else{
sd.detach();
si.detach();
}
}


